TL;DR: The essentials
- Standard format Z-R-E-F (Zone–Rack–Level–Bin) is enough for 90% of trade warehouses
- 8-step rollout from pilot area to full deployment
- Avoid typical mistakes like missing zero-padding or unclear viewing direction
- Measurable results: median search time, mis-pick rate, questions per day
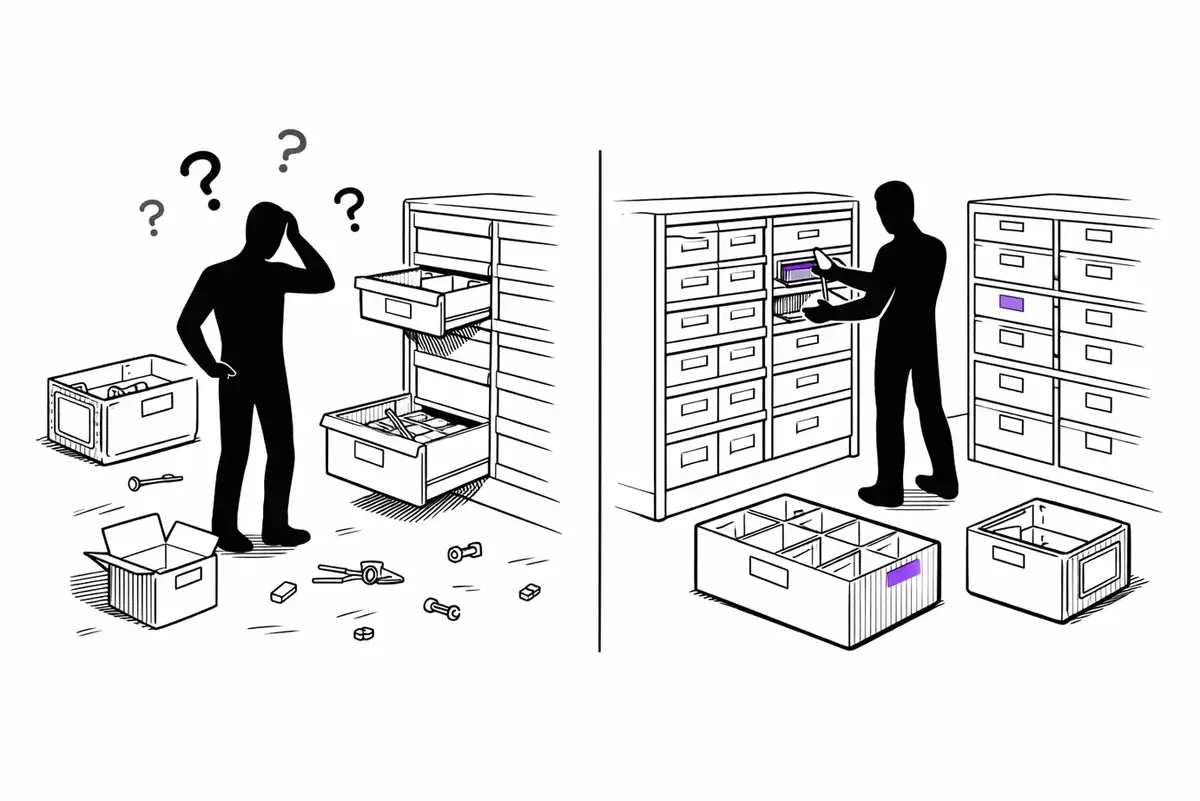
"Where is the spare part for the Müller job site again?"
This question costs trade businesses valuable productive time every day. Not because parts are missing, but because nobody knows where they are.
The solution? A simple bin location system that can be set up in 2 hours and works from day one.
Up front: This post is based on practical experience. In reality, almost every business uses its own system, depending on the building, team, material types, and existing labels. Below we show the schema that has proven robust and day-to-day practical in our projects.
Bin locations are always built like a coordinate system. Use this standard format and stick to it:
Z01-R01-E01-F01
Structure:
- Z = Zone/area (hall, workshop, container, vehicle, job-site box)
- R = Rack/cabinet/section
- E = Level/drawer
- F = Bin/box/position
Optional: Extended with aisles (logistics standard in large warehouses):
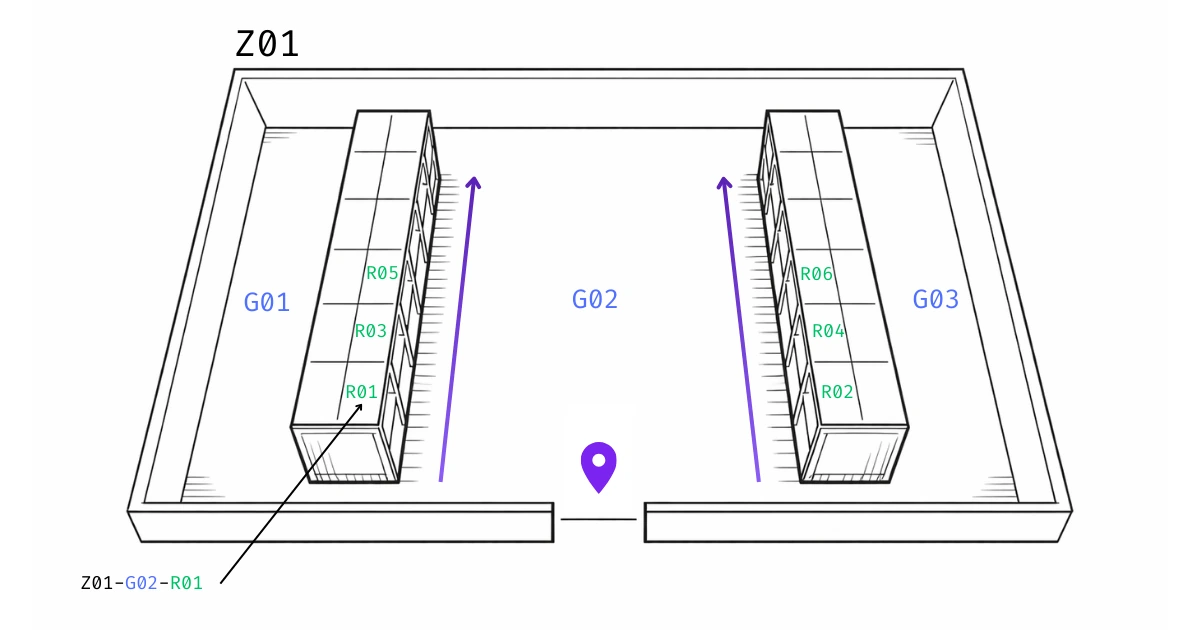
If you have real aisles: Z01-G02-R03-E02-F08 (G = aisle, German: “Gang”)
Note:
In many warehouses, the standard schema is G-R-E-F = aisle–rack–level–bin. Use it if you don't need zones, e.g., because you only have a small warehouse with 1-2 aisles and few racks.
Then this is enough: G02-R03-E02-F08\
If you only have one aisle, you can shorten it further: use R-E-F = rack–level–bin.
Why is bin location naming important at all?
Because otherwise you’re building processes on “memory”. That can work as long as one person knows everything, but it collapses quickly with:
- More items in the assortment
- Changing staff or temps
- Time pressure (vacation, sick leave, peak season)
- Multiple sites or vehicles
Typical costs without a system:
| Problem | Impact |
|---|
| Search time | Up to 30 minutes per day per person |
| Mis-picks | Wrong part → put back, search again |
| Stocktakes | Slow, unreliable, error-prone |
| Onboarding | New staff need weeks instead of days |
| Overstock | Duplicate orders because nobody knows what’s there |
According to Mittelstand-Digital Zentrum Handwerk, time management has become a survival strategy (2026) for trade businesses, and structured warehouse processes are the first lever.
Step-by-step: Build a stable system in 8 steps
1. What is my target scope?
Define which areas you want the system to cover.
Typical areas in the trades:
- Workshop warehouse / material room
- Job-site boxes / containers
- Service vehicles
- Small-parts cabinets (drawers, Small Load Carriers)
Decision: Better to start with a small pilot (e.g., one drawer cabinet or one storage cabinet) and learn, than to do everything at once.
2. What is the smallest "bin" I want to address?
This decision determines whether your system later says: "Rack 3" (= search through 50 items) or "Rack 3, Level 2, Bin 8" (= grab directly).
Rule of thumb:
- Small Load Carriers (SLC) → F is the SLC position or bin location
- Drawers → E is the drawer, F is the subdivision
- One bin = one item → F is often enough
3. Which schema fits my warehouse?
Use the simplest schema that matches your reality.
| Situation | Recommended schema | Example |
|---|
| Small rack/cabinet, no aisles | Z-R-E-F | Z01-R02-E03-F07 |
| Real aisles + many racks | Z-G-R-E-F | Z01-G02-R03-E02-F08 |
| Vehicle / bin system | Z-R-E-F (Z = vehicle) | Z03-R01-E01-F04 |
| Container / job-site box | Z-R-E-F (Z = container) | Z05-R01-E01-F01 |
If unsure: Z-R-E-F is the best starting point for 90% of trade warehouses.
4. Where are the starting point and viewing direction?
For a bin location code to work, it must be deterministic: same place → same code. Nobody should have to “guess”.
How to define it clearly:
Starting point
Define a fixed, real starting point for each zone or aisle, e.g., entrance, packing station, workbench, or main aisle. Important: If there are multiple entrances, choose one as the official starting point and mark it (e.g., sign or arrow).
Viewing direction
Define a fixed viewing direction, e.g.:
- “From the starting point, I look into the aisle.” or “from the starting point, I look at the rack.”
- This makes “left” and “right” unambiguous, regardless of where someone is standing.
Counting direction (positions & levels)
Define a fixed counting rule and apply it consistently:
- Positions count forward in the viewing direction (1, 2, 3, …)
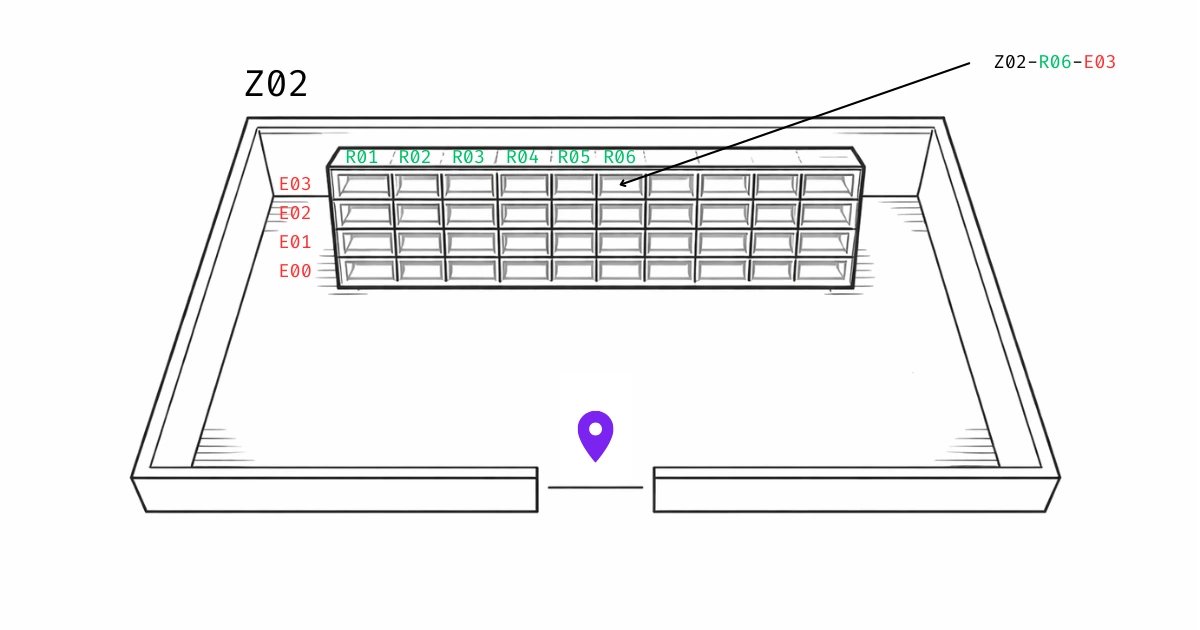
- Racks count left to right (
R01, then R02, R03 ...) - Levels count bottom to top (
E00 or E01 at the bottom, then E02, E03 …) - Bins (within the level) count left to right (
F01, then F02, F03 ...)
Side logic (optional, but very useful)
If you have two rack rows facing each other, define a clear side logic, e.g.:
- left = odd rack numbers (
R01, R03, …) - right = even rack numbers (
R02, R04, …) (Or vice versa, what matters is: define once, never change.)
Mini test (immediately shows whether it’s truly unambiguous):
Explain the rules to a new person in 2 minutes.
Then give them 3 bin location codes.
If they find all three locations without questions, your system is unambiguous.
If not, starting point/viewing direction/side logic is usually too vague or not visibly marked.
Rules you can adopt
- “Starting point is here”
- Viewing direction into the aisle
- Racks from front to back
- Levels from bottom to top
- Bins from left to right
Recommendation (readable and simple):
Z01-R03-E02-F08
Format standards:
- Zero padding:
01, 02, 03 … (not 1, 2, 10) - Fixed order: Z-R-E-F (optional G)
- One separator: hyphen
- (or dot .), don’t mix - Avoid similar characters: O/0, I/1, S/5
6. How do I generate codes without mistakes?
Make it mechanical, not creative.
Approach:
- Define zones/areas (
Z01…Z0n) - Number racks/cabinets (
R01…Rxx) - Define levels/drawers per rack (
E01…E0x) - Define bins/SLC positions per level (
F01…F0x)
Important: Better to reserve number blocks (leaves room for growth) than to rename later.
7. How do I label it so it works in 2 seconds?
A good system often fails because of bad labels.
Label structure (KISS):
- Large: plain-text code (e.g.,
Z01-R03) for rack 03 in zone 01 - Optional: below that: barcode or QR with the exact same value
- Material: wipe-resistant, abrasion-resistant, strong adhesive (depending on environment)
Placement:
- Where you look/search: eye level / rack upright / aisle entrance
- Not: behind foil or where boxes cover it
How to label your racks correctly and which labels we recommend, explained in the following article: Shelf labels for small warehouses: 3-step guide to professional rack labeling
8. How do I roll it out without disrupting operations?
Rollout plan that has proven itself in practice:
- Choose a pilot area (1 rack or 1 cabinet)
- Create codes + labels
- 1 week of test operation (collect errors, sharpen rules)
- Roll out zone by zone
- Cut-off date: From then on, no more improvised locations
- Post a visible work instruction (see below)
Examples: Build the code step by step
1) Material room (zone): Z01
2) Rack in the material room: Z01-R01
- Z01 = material room
- R01 = rack 1
3) Level in the rack: Z01-R01-E01
- Z01 = material room
- R01 = rack 1
- E01 = level 1
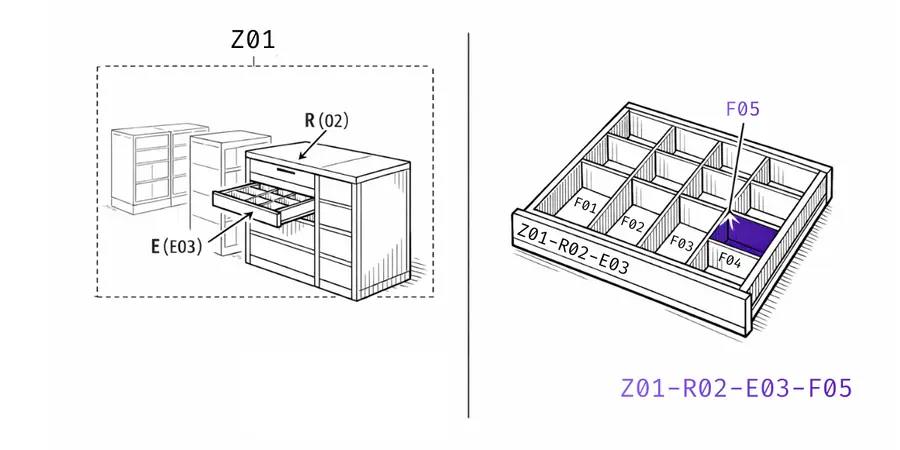
4) Smallest bin location within the level: Z01-R01-E01-F01
- Z01 = material room
- R01 = rack 1
- E01 = level 1
- F01 = bin 1 (smallest addressable bin)
Rule of thumb: From coarse to fine: zone → rack → level → bin
The 10 most common mistakes (+ quick fixes)
| # | Mistake | Fix |
|---|
| 1 | Naming locations by contents | Switch to coordinates (location ≠ contents) |
| 2 | Duplicate codes | One code = one location (never repeat) |
| 3 | Mixed logic by area | One schema for everything (Z-R-E-F) |
| 4 | No zero padding | Always 01/02/03 instead of 1/2/10 |
| 5 | Unclear viewing direction | Document the perspective + test it |
| 6 | Codes too long | As short as possible, as long as necessary |
| 7 | Labels placed poorly | Label where hands/eyes go |
| 8 | “Shadow locations” appear | Introduce cut-off date + assignment rule |
| 9 | Meaning-based zones that move | Keep zones neutral (area 01/02) |
| 10 | No pilot | Test small first, then scale |
Measurable results: Mini-audit “Warehouse clarity” + before & after
Which 5 metrics are useful?
- Median search time per pick (seconds)
- Questions per day (“Where is…?”)
- Mis-pick rate (mis-picks / picks)
- Time until a new person can do 10 picks (minutes)
- Share of improvised locations (counted during a walk-through)
How do I measure in 30 minutes?
- Pick 20 typical items (fast movers + rare ones)
- One person picks, you time the search
- Note questions + mis-picks
- Measure again after pilot labeling
Output idea (for internal documentation):
- Before/after table
- 3 observations (“What helped concretely?”)
- Next step (e.g., rollout to zone Z02)
Cost-benefit calculation: What do you actually get?
Time investment:
- Planning: 30 minutes
- Pilot (1 rack): 1 hour
- Measurement: 30 minutes
Savings from day one:
A structured bin location system measurably reduces search time. With 30 minutes of daily searching per person, recovering 10 to 20 minutes per day is a realistic outcome.
With a team of 3:
- 0.9 hours per day
- 4.5 hours per week
- 225 hours per year
Monetary value (at €50/hour):
- 225 hours × €50 = €11,250 saved per year
ROI calculation:
Investment: 2 hours of work = €100
Savings in year 1: €11,250
ROI: 11,150%
A good bin location system is the foundation for digital inventory management. Without clear location logic, even the best apps won’t work.
Recommended combination:
- Z-R-E-F system for the physical structure
- Barcode/QR labels on every location
- Mobile warehouse app for scanning and posting
Which digital warehouse management tools work for small trade businesses (incl. cost comparison): How to organize your warehouse in the trades: software comparison + best practices for efficient storage
Conclusion: What’s the next concrete step?
- Commit to Z-R-E-F
- Define starting point + viewing direction
- Label one rack as a pilot
- Measure before/after with the mini-audit
- Roll out zone by zone
The best bin location system is the one you actually use. Perfection is the enemy of "good enough". Start simple, test fast, improve step by step.
For a comprehensive overview of warehouse organization in the trades, we recommend our guide: How to organize your warehouse in the trades: Efficient storage & digital tools.
Sources & further reading