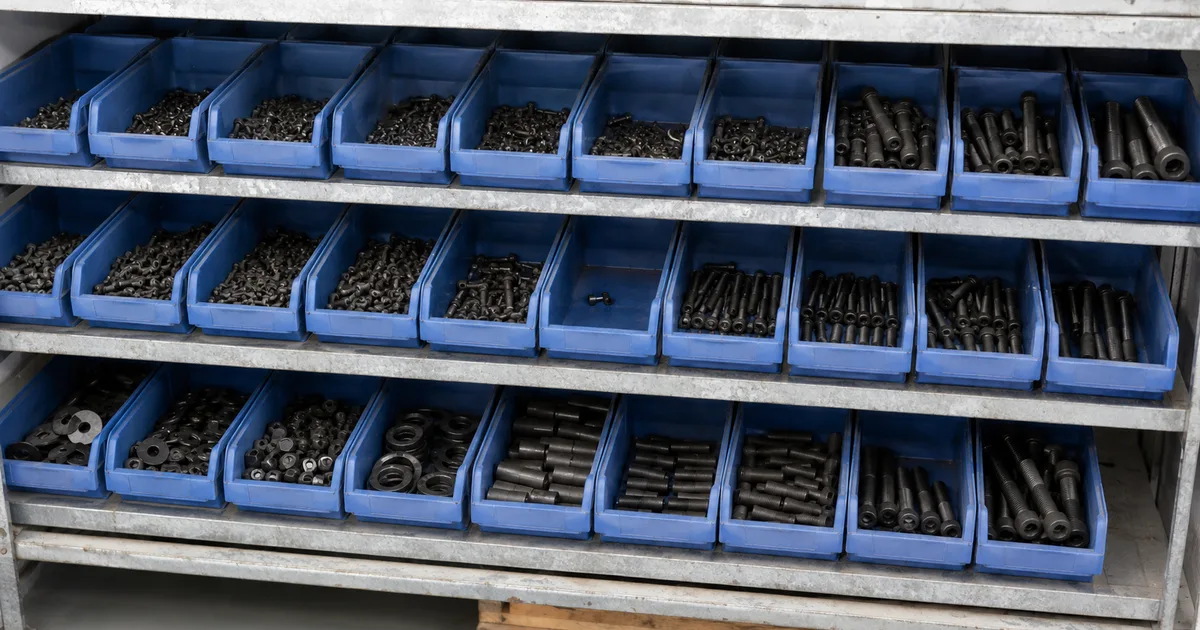
Shelf labels done in 30 minutes, under EUR 20: fill in a template, print, stick on.
Template & print: CSV template in the label generator (no account) or Excel template in Avery Design & Print.
Format: Shelf-Level-Bin, e.g. 01-01-01 (with aisles: A-01-01-01). Bottom to top, left to right. Once defined, never change.
Label material: paper (dry, cheap), film (humid, robust), magnetic (seasonal, reusable). For 90% of businesses, paper is sufficient.
Barcode rule: one unique code per bin location. Barcode stores only an ID, not the item name.
Are you standing in front of your shelf searching for that one specific Gira switch again? Is your warehouse a chaos of post-its, faded marker notes, and makeshift labels that blow away at the first breeze?
Thousands of tradespeople, small online retailers, and workshop operators know this problem: Without proper shelf labels, you waste valuable time every day searching, order items twice, and lose track of your inventory.
The good news: Professional shelf labels for small warehouses are neither expensive nor complicated. With the right software, suitable material, and a well-thought-out but simple numbering system, you can bring order to your warehouse in just 30 minutes.
Whether you call it shelf labeling, warehouse labeling, or bin location labeling: it always means the same system of uniquely named storage locations and matching labels.
Who is this guide for?
This guide is aimed at small warehouses with fixed storage locations. The recommendations that follow come from hands-on experience and don't claim to represent a binding standard.
Typical scenario:
M6 screws are always at bin location 01-01-01
Cable clamps always at location 02-03-04
Rearranging happens 1-2 times per year (or never)
Not suitable for:
E-commerce with daily changing items or fulfillment centers with flexible storage
In this guide you'll learn:
Which label material suits your business and the environment of your warehouse
Whether you need one or two labels per item/bin location
Which 4 free tools you can use immediately
How to build a unique numbering system
How to use QR codes and barcodes correctly
Time required: 30 minutes | Costs: Under $20 | Time saved: 10-30 minutes daily
Let's get started.
What Label Material Do I Need for My Warehouse?
My recommendation for 90% of small warehouses: Order paper labels from Avery. Cost almost nothing, can be printed with any laser printer, and are perfectly fine for dry indoor spaces.
But not every label works everywhere. So here's a decision guide for you:
Humid environment (basement, workshop with splash water)?
Then: Film labels, because waterproof, tear-resistant, durable
Then: Magnetic labels without adhesive residue, reusable
Example: Magnetic warehouse labeling (100×50mm)
Only dry indoor space + rarely any changes?
Then: Paper labels, because cheapest option and completely sufficient
Example: Avery Zweckform 70x36-R (70×36mm, 1200 labels for ~EUR 20, often cheaper on Amazon)
One or Two Labels? What Fits Your Warehouse?
In practice, two approaches have proven successful:
Option 1: Only Combo Label (simple, cheap to set up)
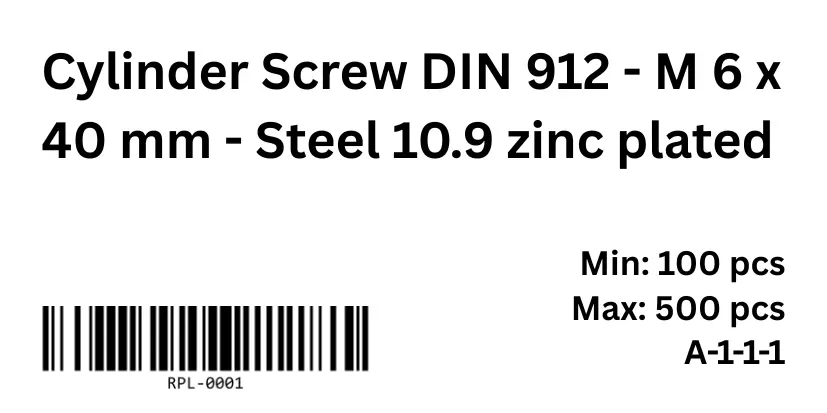
Here's what a minimalist combo label can look like:
One label contains all important information such as:
Bin location: 01-01-01
Item name: Socket Head Cap Screw DIN 912 M6 × 40 mm
Optional: Barcode/QR code, internal item number, supplier name, photo, storage unit, etc.
Advantages:
Quick and cheap (one label per location)
Clear with few shelves
Less printing effort
Downside: The bin location and the item sit on the same label. If you want to slot a third item (C) in between items A and B, then B and every item after it shifts one position over - and their bin-location number no longer matches. You then reprint the whole row, not just one label for C. If the bin location were on its own fixed label on the shelf, a single reprint would do.
In short: Option 1 is cheap to set up, expensive to change.
Option 2: Separate Bin Location Label + Combo Label
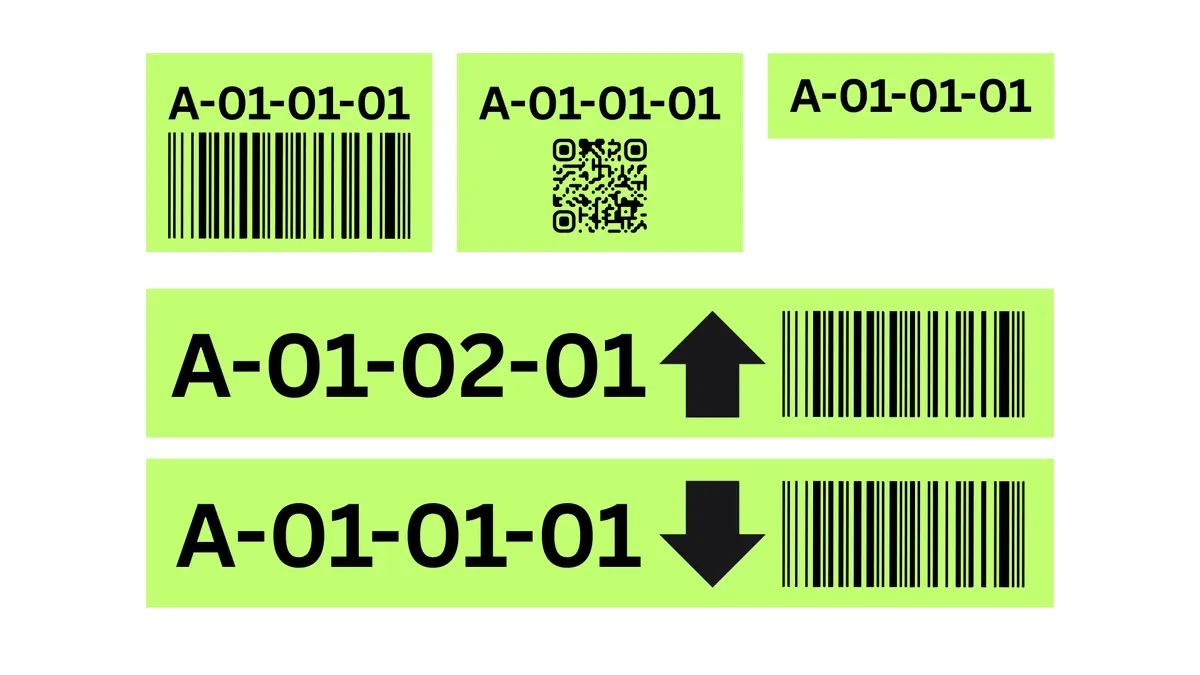
A few examples of how you can design bin location labels: large aisle labels with a directional arrow, alongside compact variants with a barcode, QR code, or just the bin location ID.
Two labels side by side:
Separate bin location label (e.g., 100×50mm), label should ideally be as tall as your shelf level allows.
Only "01-01-01" in large font
Readable from 10-13 feet away
For quick orientation in the aisle
Combo label next to it (e.g., 70×35mm) without the bin location! Label should ideally be as tall as your shelf level allows.
Item: Socket Head Cap Screw DIN 912...
Barcode: WHS-0001
Minimum stock: 100
Further individual details
Advantages:
Bin location recognizable from a distance (e.g., from the tool cart)
Clear separation: Where is it vs. What is it
The bin-location number stays fixed on the shelf, so every insert or re-sort costs you just one new item label instead of the whole row
With movable containers (bins, boxes), the bin-location ID belongs on the container itself too, not just on the shelf. If someone puts a box back in the wrong slot, its ID sits visibly next to a different one on the shelf: the mistake shows up right away instead of only at the next stock count.
In short: Option 2 costs a bit more to set up than Option 1, but is cheaper to change.
Decision guide:
Criterion
Only Combo Label
Two Labels
Main advantage
Minimal setup effort
Cheap to change & re-sort
Changing / re-sorting
Reprint the whole row
Just one item label
Search time
You know your warehouse by heart
"Where was 03-03-02?" → Visible from 10-13 feet
Frequency in warehouse
Daily, everything familiar
Occasionally or changing people
Shelf setup
Compact, manageable
Multiple aisles/shelf rows
Setup cost
few cents (one label)
a bit more (two labels)
My recommendation: Do it right from the start and separate the two - bin location on the fixed shelf label, item on the movable one. The slightly higher setup effort pays off the first time you insert or re-sort, because you reprint just one label instead of the whole row. Only if your warehouse stays truly stable and you almost never rearrange is a combo label enough.
Already started with a combo label?
If you or your team are searching too long - the apprentice keeps asking "Where is 03-01-02?" - that's the moment to switch to the separated setup.
How Do I Name and Mark My Bin Locations?
Before printing labels, you need a unique system for your bin locations, which is why we'll briefly address the topic here.
The Shelf-Level-Bin System
Standard format:Shelf - Level - Bin
Example:
01-01-01 = Shelf 1, Level 1, Bin 1
02-03-02 = Shelf 2, Level 2, Bin 3
Important: Always number levels from bottom to top and bins within a level from left to right
How Do I Number My Shelves?
Scheme
Example
When to use?
Shelf-Level-Bin (numeric)
01-01-01, 02-03-04
Standard: one room without aisles
Aisle-Shelf-Level-Bin (letter = aisle)
A-01-01-01, B-02-03-04
Multiple aisles or halls
Important: Every Bin Location Needs a UNIQUE ID!
Why?
You can assign items to unique bin locations
Helpful for communication with colleagues (Wago connector can be found at 01-03-04)
Creates the foundation for your entire warehouse organization.
Enrich your master data or item data in your warehouse software with it. Saves search time, because you find things faster and have to search less.
Which Software Is Suitable for Shelf Labels?
You don't need expensive programs. Here are 4 free tools you can start with immediately, plus the option straight out of your warehouse software:
Tool 1: Avery Design & Print - the classic for beginners ⭐⭐⭐
Why Avery?
Completely free, no registration
Works directly in the browser
Excel import with automatic mail merge
Perfectly matched to Avery label sheets
With serial barcode generation or conversion of data to Code-128 barcode
Here's how in 5 minutes:
Buy label sheets
Search on Amazon for: Avery Zweckform 70x36-R (70×36mm, cost: ~$20 for 1200 labels)
Open Canva → Search "Label" → Filter "Free" + 70×35mm
Customize
Change text: "01-01-01", "Socket Head Cap Screw DIN 912 - M6 x 40 mm - Steel 10.9 galv. zinc plated"
Insert QR code or barcode: Apps → "QR Code" → Enter "WHS-0001"
Adjust colors (e.g., red for hazardous materials, blue for office supplies)
Export
Export as PDF
Print on Avery sheet
Disadvantage: No automatic Excel import in the free version, each label must be created separately, which is very time-consuming Advantage: Your labels look professionally made
Labels come straight from your stock, no Excel export
68 sheet formats including Avery 70×36-R, plus Code 128, EAN-13 and QR code
PDF export for any standard laser printer
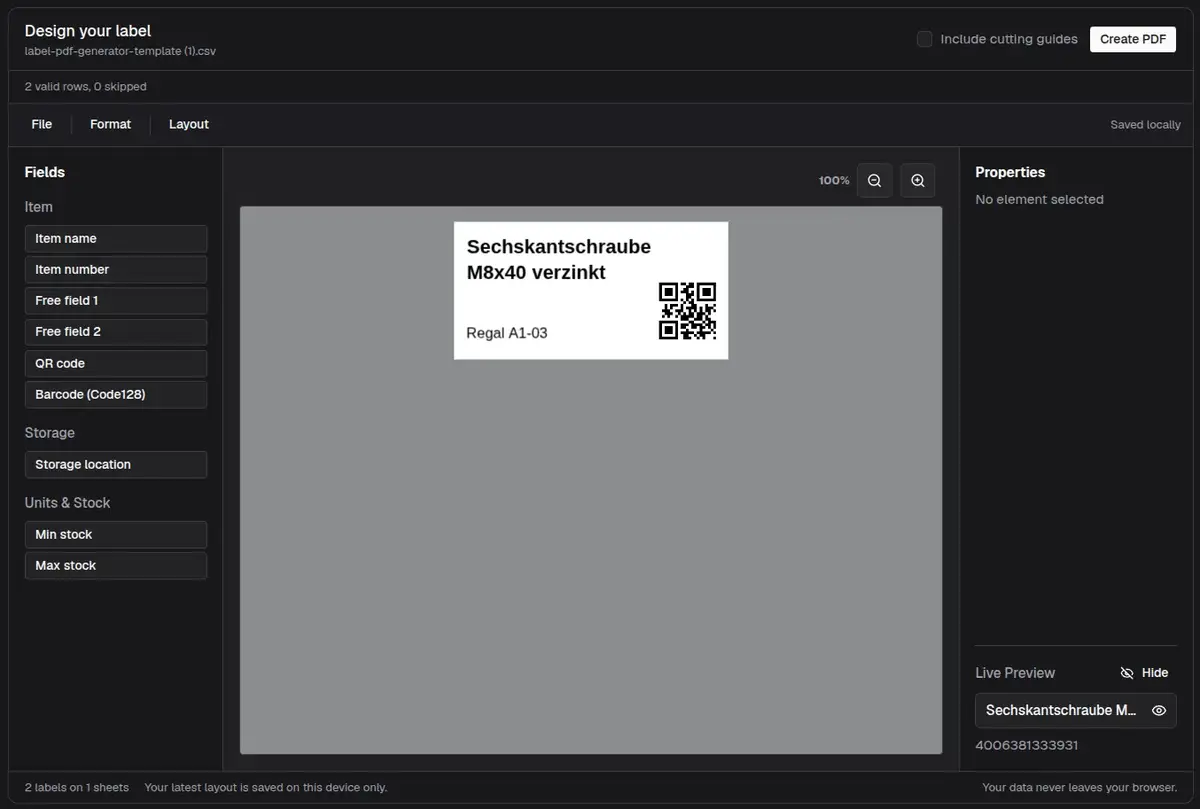
Difference from the generator above: The label generator prints the sheet from a CSV you put together every time. In the Label Designer, item name, number and storage location come from your master data. That pays off as soon as you reprint regularly. The free plan (25 active items) lets you check beforehand whether it fits your warehouse.
Which Tool Fits Me?
Tool
Best for
Excel Import
QR Code
Barcode
Costs
Learning Curve
Avery Design & Print
Quick start and free
✅ Yes
🚫 No
✅ Yes
💰 $0
🕒 5 Min
repleno Label Generator
Starting right now, without an account
✅ Yes (CSV)
✅ Yes
✅ Yes
💰 $0
🕒 5 Min
Labeljoy
Many labels and professionalization
✅ Yes (CSV)
✅ Yes
✅ Yes
💰 $0
🕒 25 Min
Canva
Quick designs
🚫 Manual
✅ Yes
✅ Yes
💰 $0
🕒 10 Min
repleno Label Designer
Straight from stock, without building a list
✅ Automatic
✅ Yes
✅ Yes
💰 Free plan up to 25 active items
🕒 10 Min
My recommendation: Start with our label generator. CSV in, PDF out, no account and no email address. For shelf labels on a standard sheet that's enough. If you need an exotic sheet format or a free-form layout, create an account for Avery Design & Print. And if your items already live in warehouse software, skip the list building altogether.
Every storage location, shelf, and item gets a unique, readable ID, through markings, labels, or barcodes. That way, everyone on the team instantly finds the right spot, whether they know the warehouse layout or are new. The shelf labeling in this guide is the manual foundation; barcodes make it machine-readable on top.
How Do I Set Up a Barcode System for My Warehouse?
Barcodes turn that manual basis into something you can scan, not just read.
Why Barcodes on Labels?
Barcodes make bin locations or items uniquely identifiable, so people and software always refer to the same object. They replace error-prone reading and typing with a quick scan. In software and apps, you link barcodes to inventory, items, and minimum quantities: you record withdrawals instantly and trigger reorders reliably.
Without barcode:
Type bin location 01-01-01 in app → typo possible
With 100 items: lots of manual work → waste of time
With barcode:
Scan via app or barcode scanner → automatically captures correct ID
Postings within seconds
The most important rule: One unique barcode = One bin location!
Example using the ID twice, WRONG:
Barcode "WHS-0001" for 01-01-01
Barcode "WHS-0001" for 02-02-02  ❌ NOT unique! Good software won't allow duplicate assignments or will flag them.
Important: Multiple items and barcodes can also be assigned to one bin location. This is the case in practice when dividers separate a container into compartments for low-volume items (ferrules, etc.).
Can I Combine Item Name AND Barcode?
YES! This is even recommended:
||||||||||||||||||
[Barcode WHS-0001]
Socket Head Cap Screw DIN 912 M6 × 40 mm
01-01-01
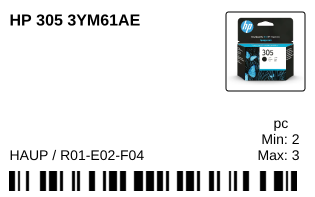
Printed out, a combo label can look like this, generated directly from the repleno label designer, with product photo, min/max stock and bin location code:
Why both?
Barcode → for fast scanning via app. For software, orders, inventory postings and stocktaking
Item name → for quick finding without scanner
Important: The barcode stores ONLY an ID (e.g., "WHS-0001"). The ID is married to an item in the software and can be assigned and posted through it. A barcode does NOT store the item name. The name is only visually printed on the label.
How Do I Plan My Label System Correctly?
Step 1: Analyze Warehouse Layout
Take 10 minutes and sketch your warehouse by answering the following questions:
Which shelves are most frequently accessed?
Where do you need larger labels (visible from a distance)?
Which areas need color codes (e.g., hazardous materials)?
Tip: Take a photo of each shelf. Then you'll know exactly how many labels you need later.
Step 2: Define Numbering System
Standard (one room without aisles): Each bin location is uniquely described by Shelf, Level, Bin, all numeric. Within a shelf, numbering is consistently from left to right and from bottom to top, so every location remains logically findable.
Shelf - Level - Bin
01-01-01 (Shelf 01, Level 01, Bin 01)
01-02-03 (Shelf 01, Level 02, Bin 03)
02-01-05 (Shelf 02, Level 01, Bin 05)
With aisles (larger warehouses, multiple halls): Once one room isn't enough, put an aisle letter in front: Aisle-Shelf-Level-Bin. Everything else stays the same.
Aisle - Shelf - Level - Bin
A-01-01-01 (Aisle A, Shelf 01, Level 01, Bin 01)
A-02-02-03 (Aisle A, Shelf 02, Level 02, Bin 03)
B-01-01-05 (Aisle B, Shelf 01, Level 01, Bin 05)
Important: Once defined, DON'T change anymore! Otherwise your records won't match.
Step 3: Define Color Codes (optional)
Colors help quickly distinguish areas:
Color
Meaning
Example
🔴 Red
Hazardous materials
Chemicals, cleaners
🔵 Blue
Office supplies
Paper, pens, folders
🟢 Green
Shipping / Packaging
Boxes, tape
🟡 Yellow
Frequently used
Screws, dowels
⚫ Black
Tools
Drills, cordless screwdrivers
Which Printer to Use and How to Apply Labels Correctly?
Which Printer Is Best for Labels?
Commercial Laser Printer (Recommended):
✅ Waterproof, smudge-proof
✅ Sharp, even with small font
✅ Cheap to maintain
Inkjet Printer (Not recommended):
Smears when exposed to moisture
Fades faster
More expensive due to cartridges
Label Printer (for professionals):
Brother P-Touch Cube (around $60) Bluetooth, app control
DYMO LabelWriter 450 (around $95) Thermal printing, no toner needed
Positioning and Adhesion
Where to apply?
Always at eye level (4.6-5.2 feet)
For tall shelves: Labels on the front edge of each shelf level
Additionally: Large number on the shelf side (visible from a distance)
Before sticking:
Wipe shelves with alcohol or cleaner
Let dry (2 minutes)
Press label firmly
Tip: For rough surfaces (wood, concrete), use magnetic labels or clear sleeves with cable ties
Which Mistakes Should I Avoid When Printing Labels?
Mistake 1: Font Size Too Small
Wrong: 8pt font, not readable from 6 feet
Right: At least 18pt for shelf numbers, 12pt for details
Mistake 2: Duplicate QR/Barcodes
Wrong: Code "WHS-0001" used multiple times in warehouse
Right: Code "WHS-0001" only 1x, linked to Socket Head Cap Screw DIN 912 - M6 x 40 mm - Steel 10.9 galv. zinc plated
Mistake 3: Crooked Application
Wrong: Labels crooked, unprofessional
Right: Use shelf edge as orientation
Mistake 4: Inkjet Printer for Workshop
Wrong: Ink printing smears when exposed to moisture
Right: Use laser printer or film labels
Mistake 5: Too Many Color Codes
Wrong: 10 different colors, nobody understands
Right: Maximum 5 colors, clearly defined, otherwise just leave white!
Sustainable and Reusable Label Solutions
Environmentally Friendly Materials
Paper labels from recycled material:
FSC-certified (e.g., Avery Recycled line)
Biodegradable adhesives
Cheap and perfectly fine for indoor spaces
Reusable magnetic labels:
No adhesive, no residue
Multiple labeling (with wipeable marker)
Perfect for seasonal items
Wipeable plastic labels:
Label with foil pen
Wipe off with alcohol and relabel
More durable than paper
How Do I Keep My Label System Efficient Long-term?
A good label system thrives on maintenance. So here are three points on how to succeed:
1. Regular Control
Every 3 months: Check labels for readability
After each rearrangement: Update labeling
When damaged replace immediately (otherwise chaos creeps in)
2. Inventory-friendly Structure
Number systematically from left to right, bottom to top:
✅ Get material: Avery 70x36-R labels + commercial laser printer ✅ Choose software: Avery Design & Print (beginners), our label generator (no account) or Labeljoy (power users) ✅ Numbering system: 01-01-01, with aisles A-01-01-01 ✅ Optional color codes: Max. 5 colors, clearly defined ✅ QR codes/Barcodes: Only with unique bin location ID (not product name!) ✅ Test print: First on paper, then on labels ✅ Application: Eye level, clean surface, press firmly ✅ Documentation: Excel list with all bin locations ✅ Scaling: Use specialized software later
Next Step: Get Started Now!
You now know everything you need:
1 free tool
Unique numbering system
Concrete product recommendation for application
Step-by-step instructions for implementation
Time required: 30 minutes for your first labels. Costs: Under $20 for labels. Time saved per day: 10-30 minutes that you no longer have to search.
For most small warehouses, labels in the format 70×36mm (e.g., Avery 70x36-R) are suitable. They offer enough space for bin location number, item name, and optionally a QR code, but are not too large and wasteful.
Yes, laser printers work best. Inkjet printers are not recommended as the ink smears when exposed to moisture. For regular label printing, a label printer like the Brother P-Touch Cube (around $60) is worthwhile.
Paper labels in dry indoor spaces last 2-3 years. Check every 3 months for readability and damage. Film labels last 5+ years, magnetic labels are practically reusable indefinitely.
For warehouses with fewer than 50 items, simple numbering (01-01-01, 01-01-02) is sufficient. QR codes or barcodes are worthwhile from 50+ items or when using warehouse management software. Important: Each QR code or barcode must be unique (e.g., "WHS-0001", not "Screws").
Entry costs: $10-20 for Avery label sheets (240 pcs). Software is free (Avery Design & Print, Canva, Labeljoy). Optional: Label printer from $60. Total costs for small warehouse: $15-90.
Avery Design & Print is the easiest: Free, no installation, Excel import works perfectly. Canva is good for nicer designs. Labeljoy is ideal if you want to print 50+ labels at once.
For uneven surfaces (wood, concrete), use magnetic labels or clear sleeves with cable ties. For round pipes: Wrap-around labels (self-adhesive, flexible) or special pipe marking.
Yes, with magnetic labels or wipeable plastic labels. You can label these with foil markers and wipe them off again with alcohol. Ideal for frequently changing inventory.